


Command Line Mode
FEFLOW can be started in command line mode in both Windows and Linux environments. This option is especially useful to call FEFLOW from user-defined code or from a bash file.
| Starting the FEFLOW executable with the suffix c will start FEFLOW without the graphical user interface (c for 'command line'). |
On Windows systems, FEFLOW can for example be called from the command line by C:\Program Files\DHI\2022\FEFLOW 7.5\bin64\feflow75c.exe
The same call with the flag -help shows all the command line options. The command line flags are the following:
| Command Line Flag | Description |
|---|---|
| -ascii | Save output in ASCII interchange format |
| -binary | Save output in binary format (default) |
| -dac <file> | Save complete computational results into <file> |
| -dar <file> | Save reduced computational results into <file> |
| -demo | Start FEFLOW in demo mode (no license required) |
| -gpu <yes|no> | Activate/de-activate GPU accelaration when CUDA device available (only with PETSc KSP solver) |
| -exit | Terminate FEFLOW after run (default) |
| -ifmdebug | Start FEFLOW in debug mode for debugging IFM plug-ins |
| -ifmregister | Register all specified plug-ins permanently |
| -ifmunregister | Unregister all specified plug-ins permanently |
| -ifmattach | Attach all specified plug-ins to the model for this session only |
| -license <options> | Force corresponding FEFLOW license, see example and license options below |
| -log <log_file> | Redirect warnings and errors into <log_file> |
| -meta | Specify which meta information about the file to save, see example and options below |
| -modules <file, file, ...> | Specify files for -ifmregister (referring to the *.dll file) |
| -modules <id, id, ...> | Specify plug-ins for -ifmattach and -ifmunregister (referring to the plug-in ID) |
| -module <IFM_plug-in> | Register IFM_plug-in for this session |
| -noexit | Do not leave FEFLOW after run |
| -norun | Do not start the simulation (plug-ins are executed as usual). |
| -password <password> | Open a protected *.fem or *.dac file by using the specified password |
| -python | Start FEFLOW in Python console (Python 2.7) |
| -python35 | Start FEFLOW in Python console (Python 3.5) |
| -python36 | Start FEFLOW in Python console (Python 3.6) |
| -python37 | Start FEFLOW in Python console (Python 3.7) |
| -python38 | Start FEFLOW in Python console (Python 3.8) |
| -python <python_args> | Open FEFLOW in Python mode, allowing direct Python command execution |
| -scripting27 <num> | Enable Python scripting (Python 2.7) |
| -scripting36 <num> | Enable Python scripting (Python 3.6) |
| -scripting37 <num> | Enable Python scripting (Python 3.7) |
| -scripting38 <num> | Enable Python scripting (Python 3.8) |
| -scripting39 <num> | Enable Python scripting (Python 3.9) |
| -skip <num> | Skip number for output time steps |
| -solver | Options: <pardiso|pcg|samg|pksp|pamg>
Switch equation system solver and uses predefined settings |
| -steps <file> | Read output time steps from <file> (*.pow) |
| -tend <time> | Redefine final simulation time (in days) |
| -threads <num>|single | Number of worker threads |
| -timer | Provide information about time requirements of different operations during a model run on standard output after the simulation run (redirect to a file via > if necessary) |
| -version | Print version info |
| -work <path> | Set new working path |
The -dac and -dar options can to be used at the same time!
A simple batch file could, for example, contain a series of FEFLOW runs to be executed consecutively:
|
"C:\Program Files\DHI\2022\FEFLOW 7.5\bin64\feflow75c.exe" -work D:\Projects\FEFLOW\ -steps times1.pow -dac
ofile1.dac ifile1.fem |
|
|
Consecutive simulations can be also carried out by running a Python script by loading the FEFLOW kernel as a Python module in a standalone Python environment. See details in our section FEFLOW and Python. |

On Windows systems, this file can be saved as a text file with the extension *.bat. Running this file the listed simulations will be performed automatically one after another.
To avoid having to type the full path of the FEFLOW executable for each call of FEFLOW, you might also add the FEFLOW installation path to the PATH environment variable of your system.
All files must be in the subdirectories of the working directory specified by the -work option. You must not write the names of the subdirectories in the batch file, FEFLOW expects the files to be stored in the default directory tree:
- supermsh <- super element meshes (*.smh)
- femdata <- complete finite element problems (*.fem)
- results <- all resulting data files (*.dar, *.dac)
-
import+export <- all import and export data (*.pow,*.lin,*.tif,*.trp, etc.)
It is recommended to use the default directory structure for all FEFLOW projects. Once you have loaded a finite element problem from such a directory FEFLOW will automatically navigate through the subdirectories during the session.
Adjusting meta information in Command Line Mode
The different categories of meta information can
be included or excluded from the model file also in command line mode.
By default, all meta categories are saved, if not stated differently in
Global Settings > File
I/O.
The options for the -meta apply
to those categories: host, net, lic, solver, user
Exclude categories
(subtract from "all"):
-meta all -lic -host -user
Include categories
(add to "none"):
-meta none +net +user
Adding user meta information
User meta information can also be added directly in command line mode. Hereby the input happens either by importing an xml file or directly as text.
Import as xml file:
-meta "user <test.xml"
The < before the file name must remain.
If the xml file is located in the import+export folder, no path indication
is necessary.
Import as text:
-meta "user = group1 {user1:Jane,
user2:John}, group2 {version1:1900, version2:2020}"
Accordingly in the GUI (Problem Settings
> Meta information):
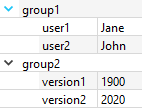
Example of user-defined Meta Information in Problem Settings dialog.
Applying a license in Command Line Mode
In both Windows and Linux environments the license can be controlled in the command line mode.
Syntax
-license [<app>:]server=<host>[:port][+<host>[:<port>]+…][,server=<host2>], [<app>:]timeout=<nnn [s]>, [<app>:]options=<options>, [<app>:]model=floating|singleseat|nodelocked|none
with
| Arguments | Description |
|---|---|
| <app> | one of feflow|simul|samg|wgeo, |
| model | is used mainly to avoid the time-consuming detection of a local dongle in case of floating licenses |
| options | specifies the options string of the license to allocate (F3, FM3, FH3 or FMH3) |
| order=<app1>[:<app2>] | define order for searching license, e.g., feflow:simul. Default is simul:feflow (only applicable to order licenses issued separately for each application) |
| password | only for internet license: requires the password used for the internet license |
| server | specifies the address of one or more license servers |
| timeout | specifies the maximum time in seconds for establishing a connection to the license server |
| user | only for internet license: requires the email address used for the internet license |
Shortcuts for simplification
and backward compatibility:
-license F3|…|FMH3 is the same as -license feflow:options=F3|…|FMH3
Samples
For dongle license:
|
"C:\Program Files\DHI\2022\FEFLOW 7.5\bin64\feflow75c.exe" -work D:\Projects\FEFLOW\ -dac Myfile.dac -timer
-license server=localhost,option=FMH3
Myfile.fem |
For internet license:
|
"C:\Program Files\DHI\2022\FEFLOW 7.5\bin64\feflow75c.exe" -work D:\Projects\FEFLOW\ -dac Myfile.dac -timer
-license user=XXX,passwd=XXXXX,option=FMH3
Myfile.fem |