


Cloud Simulations
FEFLOW model run (s) can be executed in the cloud using DHI MIKE Cloud infrastructure. The deployments of the model run (s) is a one-click solution approach directly from FEFLOW and/or FePEST graphical interfaces. In FEFLOW this new functionality is presented through a new panel Cloud Simulations. In FePEST, MIKE Cloud is available through the menu Tools.
Technical requirements
Accessing cloud resources through FEFLOW and FePEST requires the installation of FEFLOW 8.0. All the necessary software components are installed together with the FEFLOW installation package. The new Cloud Simulation panel requires the installation of both .NET Desktop Runtime 6.x and ASP.NET Core Runtime 6.x. If the installation of .NET is missing, FEFLOW will automatically deactivate the cloud functionality. The reactivation of the Cloud Simulations panel can only be done subsequently through the Global Settings (menu Tool) in the FEFLOW GUI.
A company subscription to the MIKE Cloud is required for accessing MIKE Cloud Admin (DHI's cloud storage portal) and MIKE Cloud Engine Execution services. If you are unsure about your access rights or whether your company has access to a subscription, you can contact the technical support at mike@dhigroup.com for any question.

Cloud Interface option in the FEFLOW installation package.
Overview of functionalities
In FePEST 8.0, the cloud parallelization settings are accessible through the menu Tools - Cloud Simulations.
The panel can be used to deploy one or several
FePEST projects at the time, e.g. if you are carrying out more than one
history-matching project. 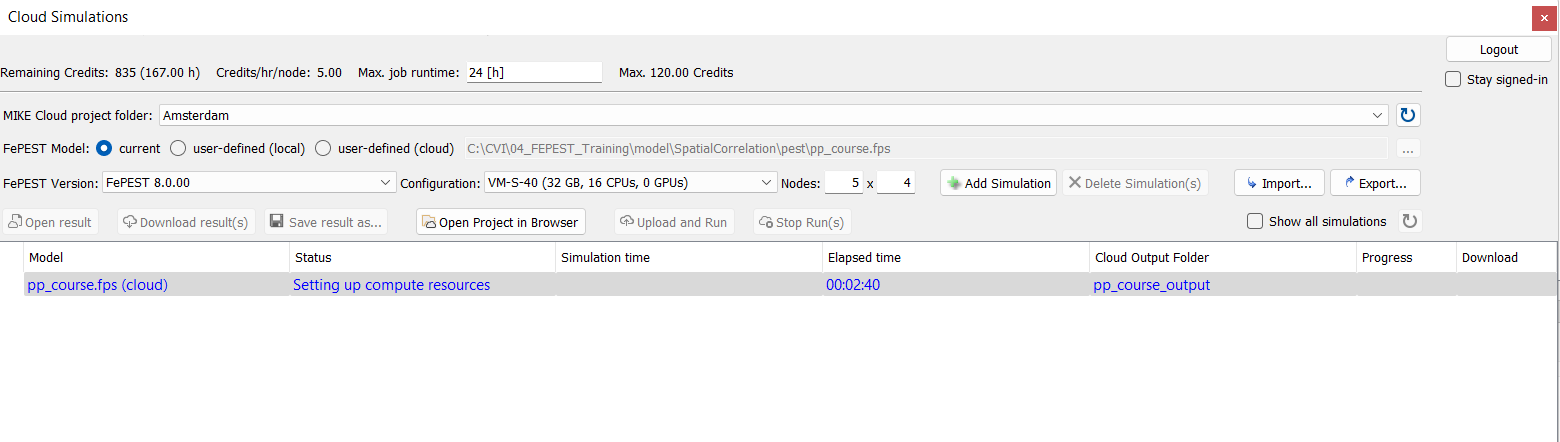
Cloud Simulations panel in FePEST.
Before getting started, you need a proper account to access the cloud services. You must log in directly through the panel (option at the uppermost right corner). The log-in operation can only be done through a company email address linked to the MIKE Cloud subscription.
MIKE Cloud project folder
When using the Cloud Simulations panel, the FEFLOW/FePEST *.fem and *.fps files are uploaded to a specific project storage in DHI MIKE Cloud Admin. The project folder is user-defined and can contain one or more FePEST projects. For every cloud run, a folder <name of the FePEST model> is created within the selected MIKE Cloud project folder. FePEST follows the typicall FEFLOW folder structure with femdata and pest. In addition, also a new folder <name of the FePEST model> + <_output> is created to store all PEST results files.
The details about the operations and workflows in MIKE Cloud Admin are presented here. After cloud optimization is finished, it is recommended to download the result files locally and delete those in MIKE Cloud Admin. The user has the full responsibility to maintain the cloud storage and not exceed the maximum capacity provided within the company MIKE Cloud Subscription.
MIKE Cloud Admin offers three project access levels: Confidential, Private and Shared. The access level is defined in the Data Admin portal and not in the FEFLOW / FePEST GUIs. In case several users are collaborating, the MIKE Cloud Project needs to be shared throughout all the users in order to make it accessible for the FEFLOW / FePEST runs.
FePEST Model
This entry corresponds to the FePEST project, which is to be used for the cloud execution. The project can be defined using any of the three options:
-
Current: The actual document opened in the FePEST GUI.
-
User-defined (local): A *.fps document located and reachable in a local directory.
-
User-defined (cloud): A *.fps document previously uploaded to the cloud and within the selected MIKE Cloud project folder.
FePEST Version
FePEST 8.0 supports two engines MIKE 2023 (FEFLOW 8.0) and MIKE 2022.1 (FEFLOW 7.5.1) for the cloud calculations. DHI will maintain always the latest two versions in each release.
Configuration
The Configuration list indicates the virtual machine where the FEFLOW model will run. There are several configurations available and suitable for both FEFLOW and FePEST. Basic information such as memory, number of CPUs and number of GPUs is listed as reference together with the configuration name. A detailed hardware information is also available via a tool-tip displayed under each configuration name.
|
|
Note that a larger VM configuration would not necessary speed-up the model simulations. The final model runtime depends on the model Problem Settings such as Problem Class (e.g., linear or nonlinear problems), Solver settings, among others. Configurations with more than 16 CPUs are intended for cases, where more than one FEFLOW run is executed in parallel. For example, in a FePEST parallelization, the VM could host several FEFLOW runs in parallel, thus the CPUs could be entirely occupied. A configuration supporting GPU is only relevant for FEFLOW models with the Algebraic Multigrid method under the PETSc solver. VM configurations with larger number of CPUs (and with GPU) will reflect a high consumption of MIKE credits. If you are not sure available your billability and costs, you can contact the general support hotline (mike@dhigroup.com) to ask such details. |

Nodes
The first number corresponds to the number of virtual machines (VMs) to be occupied for the parallelization. All the VMs will have the same Configuration. The second number corresponds to the number of workers to run in parallel within each VM.
After cloud simulation has initiated, FePEST will provide you overview of the different nodes (VMs) and the number of workers per node through the Parallelization Status panel.
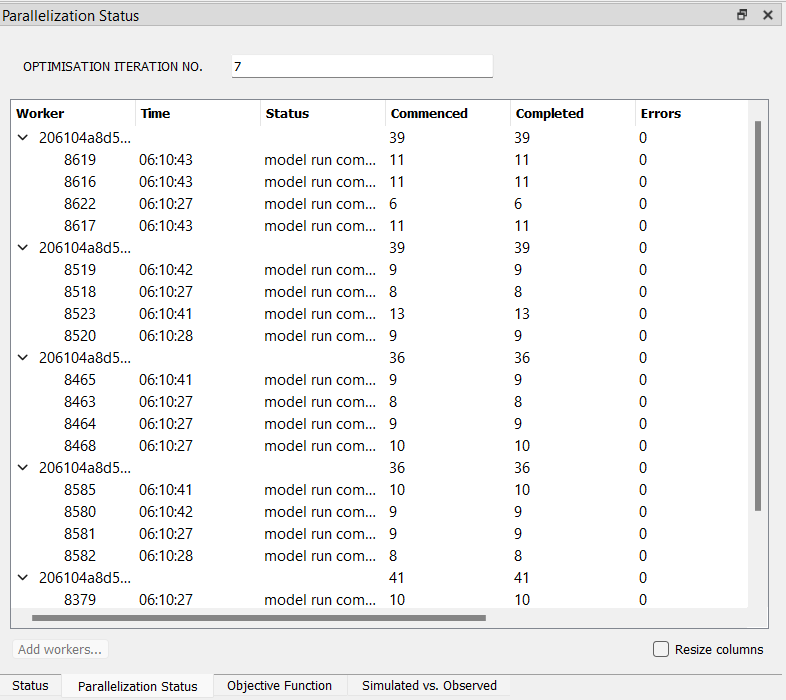
Overview of cloud runs in the Parallelization Status panell in FePEST.
Add and Delete Simulations
A Simulation is defined by the combination of a FePEST project (*.fem and *.fps files), a FEFLOW Version, Configuration and Nodes. Simulations can be created by pressing the Add Simulation button. Simulations are not started immediately. The simulation begins only after pressing the Upload and Run button.
Simulations can be also eliminated after selecting their names from the model list and pressing the Delete Simulations button. Please be aware that, after pressing such button:
-
Simulations which are not started yet are deleted without additional query.
-
If there is at least one completed (succeeded, failed, cancelled) simulation selected, the user is asked if only the simulation entry (model list in GUI) or the simulation including the cloud results should be deleted.
After deleting a completed simulation with FePEST Results in the cloud storage, this event also deletes the corresponding output folder in the MIKE Cloud project. The user could delete any output folder directly in MIKE Cloud Admin with the appropriate access level. With such as operation, the FePEST run will also removed from the list in GUI.
Import/Export from/to file
The Export functionality will save all selected simulation records into a JSON file. For the simulation records created using the option User-defined (local), the model file name is stored with a relative path (base on the exported/imported JSON file).
On the Import event, simulation records can be imported to define the modelling jobs. The file could contain also information such as configuration and FEFLOW version. Invalid records, e.g., those not matching input files, etc., are automatically discarded.
Upload and Run
The Upload and Run button uploads the FEFLOW/FePEST input files (*.fem and *.fps) and all PEST files required to the corresponding MIKE Cloud project. If the files have been previously uploaded, the process will not be repeated. After the upload operation successes, the simulation starts.
|
|
The user is fully responsible of the content of the model files to be uploaded and subsequently used for the cloud execution. There is a minimum level of comparison to assess whether a file has been already uploaded into the cloud storage portal (so-called MD5 checksum). The difference between two identical file names with almost the same model content (e.g. just a change in a FEFLOW parameter) would probably not be recognized. Especially in those cases where models files are several GBs, it is strongly recommended that the user double check the file content before uploading. |
Open result
The option requires a single simulation record to be selected from the job list and that the result files has been previously downloaded. The Open result button will automatically load the FePEST project in the GUI.
Download result (s)
After pressing the button, FePEST starts downloading all selected (completed) records to a local temporary file.
Save result as
The button Save result as downloads the result to a user-defined path/location or copies/renames the temporally-created file to the user-defined path/location, if the result has been already downloaded.
Show all completed simulations
The option adds all completed FePEST runs in the list (together with "current" simulations which are always shown).
Real-time result monitoring
In the Cloud Simulations panel, the Status of the PEST/PEST++ optimization (e.g., Success or In Progress) and the Elapsed Time are observable. All this information is continuously updated during the model run. Especially, the Elapsed Time can be used to partially understand the entire runtime of the optimization. However, the preparation of the VM (s) after the Upload and Run button has ben used, could cost additional time (in minutes) before the FEFLOW/FePEST run really starts. Therefore, the Elapsed Time may not necessary always reflect the total duration of the job.
FePEST results can be also monitored during the cloud run. For this purpose, the user needs to open FePEST *.fps project file (exactly the one sent to the cloud) in the GUI. FePEST will automatically update the different result charts such as Objective Function, Simulation vs. Observed and Parallelization Status panel among others depending on the progress of the optimization (e.g., following a new PEST/PEST++ iteration).
Plug-ins and Python scripts
The current implementation of the cloud execution supports only the use FEFLOW DHI's plug-ins (piFreeze, piChem and piHMC) attached to the FEFLOW *.fem document. These plug-ins can be installed together with the standard FEFLOW installation packages. If any other user plug-in is attached to the FEFLOW model, the job will be terminated and the Status marked as Failure. However, if any of the plug-ins requires certain interactive operation (e.g. via a plug-in GUI), the execution will not be possible within the FePEST context.
Python scripts are currently not supported with the cloud simulations. If the selected FEFLOW *.fem model contains an embedded Python script, the model run will be executed, however the Python script will be disabled.