


Installation Guideline for Linux Platforms
The description below provides a short summary how to install FEFLOW 8.0 under a Linux platform. For the installation of FEFLOW 8.0 we provide DEB and RPM packages. The FEFLOW installation packages are accessible from the Linux Download section in our website. In the website we also provide the list of supported operating systems.
Download Linux Packages for FEFLOW 8.0
Mandatory Packages
-
FEFLOW icc
-
FEFLOW qt5
-
FEFLOW gui80
-
FEFLOW console80
-
FEFLOW lm5.5
-
FEFLOW PETSc
Optional Packages
-
FEFLOW python80
-
FEFLOW PEST Utilities (v.17.2)
-
FEFLOW plugins80
-
FEFLOW cloud80
Programming Interface Package
-
FEFLOW ifm_devel
-
FEFLOW debug80
Examples, Tools and Benchmarks
-
FEFLOW datatools
-
FEFLOW benchmarks
-
FEFLOW examples
-
FEFLOW exercise
-
FEFLOW tutorial
Installation Steps
Before you continue with the steps described in the next lines, you should first install all the FEFLOW 8.0 Linux packages. The easiest manner to install all the packages is to locate them under the same directory and then simply use the next line in the Linux Terminal (depending on the distribution):
-
For Ubuntu: sudo dpkg –i *.deb
-
For CentOs: sudo yum install *.rpm
1. Start the Network License Manager (NetLM)
The Network License Manager NetLM has to be initiated before we install the license information and run FEFLOW 8.0. The administrator is located in the FEFLOW installation folder /opt/feflow/bin. In the Terminal you can start the NetLM with one line. As response, the Terminal will display information about the version of the NetLM.

Start NetLM in Terminal.
2. Verify whether NetLM is running
There are several manners to check if an application is running under certain Linux operating system. Below we have chose one of the most common option. The resulting message will provide information about the PID of NetLM.

Verify if NetLM is already running.
3. Start the License Manager Control (LMC)
All the license-related operations are carried out in the License Manager Control (LMC). LMC will helps us to establish connection to a local host or a license server, install the license information, verify the availability of FEFLOW licenses and more. LMC is located in the FEFLOW installation folder /opt/feflow/bin and can be started with the following command:

Start LMC in Terminal.
The operation of LMC is based on a list of different commands followed by their correspondent argument. In order to get an overview of all the available commands, you can simply type a question mark in the Terminal.
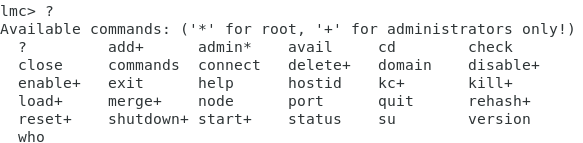
List of available commands in LMC.
4. Connect to a License server or Local Host
Prior to establish a connection between the FEFLOW client and the license server (or also local host), a proper DHI FEFLOW dongle has to be plugged.
Being LMC already started in the previous step, a connection can be established by using the keyword connect followed by the name of the license server.

Connect to a local host.
In this case, the computer used for the FEFLOW 8.0 calculation has plugged a dongle and contains a valid license sheet/file. This configuration is valid for any dongle license. If the license type if Professional, this can be installed in a license server allowing that multiple users can access to it via NetLM. The license server can be based on either Windows or Linux systems. The principle for the connection is exactly the same for the local license server (example above), the keyword connect and the name of the license server.
5. Check License Availability
Once the connection to a license server (either local host or external) has been established, you can check the availability of licenses for FEFLOW 8.0 or any other product. The keyword for this operation is av and this will display all the available products under the HOST-ID.
6. Add a New License
A new license sheet can be added directly from the Terminal using LMC or via the FEFLOW 8.0 graphical interface. For details about this second option, please refer to the Windows installation. The keyword add is used to enter a new license definition. LMC will prompt a set of different questions, whose answers are located in the FEFLOW license sheet provided by DHI.
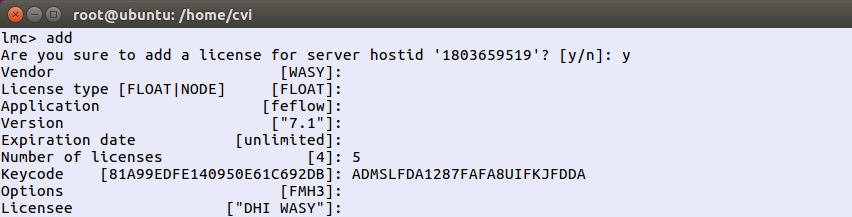
Adding a new license with LMC.
7. Closing the License Manager Control
After the license information has been installed, you can close LMC by using the keyword quit.
8. Start FEFLOW Graphical Interface
In Terminal run feflow80q to start the graphical interface version of FEFLOW 8.0.
9. Select the License
In the FEFLOW 8.0 graphical interface you can go to the menu Tools - License to open the FEFLOW License Administration. The license sheet previously entered via LMC in the Terminal should be listed in the section Available Licenses. As last step of the Linux installation, you can click on the license, click on button Apply and close the license dialog.